
This pattern is waiting in my draft list for more than a month. I have finished knitting and writing it but couldn`t take photo for the post. When it is sunny outside, I had things to do at home with kids; when I had time the weather was dark and gray. Better late than never, here is the pattern.. I hope i can publish all other craft projects waiting on my draft list soon :)
I used leftover baby yarns from my stash and knitted with 4.00 knitting needles. The gauge and size will change depending on the yarn choice and needle.
The vest is knitted starting from back part, in garter stitch. (Knit on both right and wrong side)
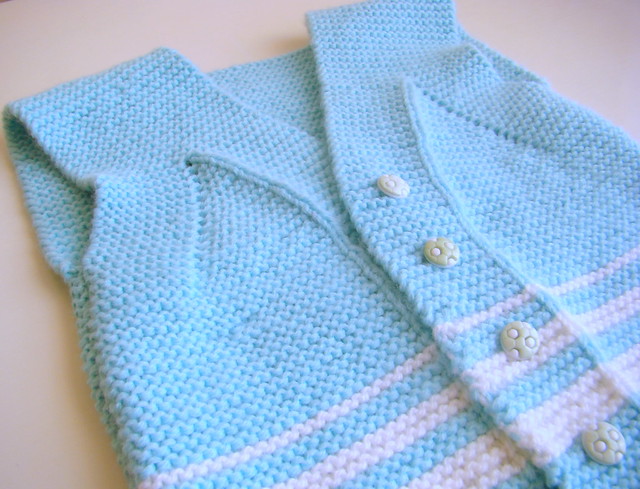
With the yarn and needle I used 5 stiches in garter stitch is 1 inch. The chest of the finished vest is 20 inch which is suitable for 12-18 months old.
WS : wrong side
RS : Right side
k : knit
p : purl
yo : yarn over
k2tog : knit two stitches together
st : stitch
- Cast on 62 stitches.
- Knit 61 garter ridges. (I knitted 10 garter ridges in main color, 3 garter ridges in second color, 2 garter ridges in main color, 2 garter ridges in second color, 2 garter ridges in main color, 1 garter ridge in second color and continued knitting in main color)
- (RS) k21 (this is right front stitches, pass stitches on a stitch holder), cast off 20, k21 (this is left front stitches).
Left Front :
- Knit 21 stitches in 19 garter ridges.
- On right side, k11, yo, k10
- On wrong side : k11, p1, k10
- (RS) : knit until you have 10 st left in your left needle, yo, k10
- (WS) : knit until you have 11 st left in your left needle, p1, k10
- continue knitting the last 2 rows until you have 35 stitches
- (RS) : k25, yo, k10
- (WS) : k25, p1, k10
- (RS) : k4, k2tog for button hole, yo, knit to the end, if you knit for girls make the button hole on the right side.
- (WS and all WS) : knit until you have 11 st left in your left needle, p1, k10
- RS : knit all stitches
- Repeat these two rows until you have 32 garter ridges from the first button hole. Don`t forget to make button holes after 8 garter ridge of each button hole. After 12 garter ridges I knitted one garter ridge in second color to match the colors on back.
- Cast off.
Right Front :
- Pass 21 stitches from stitch holder to knitting needle. The wrong side of the vest facing to you, start knitting.
- Knit 21 stitches in 19 garter ridges.
- On right side, k10, yo, k11
- On wrong side : k10, p1, k11
- (RS) : k10, yo, knit to the end
- (WS) : k10, p1, knit to the end
- continue knitting the last 2 rows until you have 36 stitches
- (RS) : knit all stitches (if you are knitting a girl vest, you need to make button hole in this row)
- (WS) : k10, p1, knit to the end
- Continue knitting these two rows as long as the left front.
- Cast off.
- Sew sides.
Happy knitting!
Thankyou so much for sharing your lovely pattern.
ReplyDeleteHi , I'm knitting this cute vest but think I may have gone wrong; I'm half way through the left side and it doesn't look quite right. I have a feeling I've read the pattern wrong where it mentions garter ridges. Does 1 garter ridge equal two rows, not one?
ReplyDeleteHi,
ReplyDeleteGarter ridges mean two rows of knitting. You can check the video here : https://www.youtube.com/watch?v=2KoeTIcRBgA
On left front where it says to repeat the two rows until 32 garter ridges I don't understand If those two rows are repeated it doesn't increase or make any more button holes. Which two rows should be repeated?
ReplyDeleteHi
ReplyDeleteIs the video working, I have the same problem like Anne
How long is this vest supposed to be measured from the back down. I need 20 more ridges just to get to the front sections and it seems pretty long already.
ReplyDelete(WS and all WS) : knit until you have 11 st left in your left needle, p1, k10
ReplyDeleteRS : knit all stitches
Repeat these two rows until you have 32 garter ridges from the first button hole. Don`t forget to make button holes after 8 garter ridge of each button hole. After 12 garter ridges I knitted one garter ridge in second color to match the colors on back.
these two rows are repeated.
If you are using a chunkier yarn, your vest might be longer and bigger beaz.
ReplyDeleteMaybe I'm being dumb, but according to the instructions, the pattern begins on the back. My question is I don't know how many total garter ridges to knit before separating for the fronts. I tried to count the way you did yours by totaling the two colors, but then it says to continue in main color. I don't know how many rows to continue before separating.
ReplyDeleteTotal 61 garter ridges
DeleteThe back and front parts are knitted seperately, when you finish the pieces you will sew them.
ReplyDeletebeautiful..thank you
ReplyDeleteThanks so much for sharing this beautiful pattern. I used worsted weight yarn on 4.5 mm needles and it fits my 4 years old grandson perfectly.
ReplyDelete