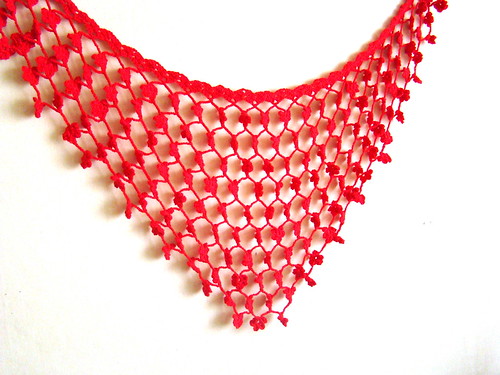
This is a very easy and relaxing project that can be completed in a few hours with some basic crochet stitches. When you start making, it may seems it will take hours and hours to finish your shawl. As you continue, 2 flowers are decreased in each row so you won`t understand when you finished your shawl :)
Yarn and hook : You can use double knitting or any other light weight yarn with a suitable hook. I prefer making this scarf with mercerized cotton yarn and 3.5 mm hook. To show better for the tutorial I used aran weight yarn with 4.00 mm hook.
Abbreviations :
- ch : chain
- dc : double crochet
- sst : slip stitch


First row of flowers :

1 - ch 14, sl st in the 7th chain.
2 - To make the first petal ch3, make 2 dc,ch3 and sl st in the chain ring.
3 - Make 4 petals more for the flower. ch 7 and sl st in the ch3 space on your border.

Repeat these 3 steps to the end, cut the yarn.
Second row of flowers :
- skip the first flower, sl st on the 3rd petal of 2nd flower.
- ch 14, sl st in the 7th ch.
- Make 5 petals for the flower, sl st on the 3rd petal of the next flower.
Continue making flowers until you have 1 flower left at the end of the row. Skip the last flower.
You will decrease 2 flowers on each rows to make a triangle scarf, repeat the rows until you finish the scarf.
You can iron the flowers on damp cloth but before ironing please check your yarn label.
If you have any questions with the pattern, I am happy to answer them.
You can purchase the scarf from my shop, if you want me to make one for you please do not hesitate to contact me :)
You can iron the flowers on damp cloth but before ironing please check your yarn label.
If you have any questions with the pattern, I am happy to answer them.
You can purchase the scarf from my shop, if you want me to make one for you please do not hesitate to contact me :)
Enjoy making it!
I have a great fuchsia yarn that will be perfect for this. Off to get my hook! Thanks for sharing this pattern.
ReplyDeleteLove it! Thank you for sharing!
ReplyDeleteThis is very cute. Perhaps I missed it in the directions but how much yarn do I need?
ReplyDeleteThanks for posting his! It is a lovely pattern and I want to make this! :) :)
ReplyDelete______
Lee Ann H
Crochet...Gotta Love It! Blog
Crochet...Gotta Love It! Website (crochet names and rosary patterns)
I'm pretty sure it's a typo but your directions on #2 say to repeat until piece measures 50'. Did you really mean 50 feet?
ReplyDeleteNo, it is not feet. It is 50 inch :)
ReplyDeleteI corrected it now, thank you :)
it is a beauty, thank you so much, I hope to make it as soon as possible!
ReplyDeletei really like it, do you start each row new by cutting your yarn and slipstitching it on again, that part isn't clear to me i am sorry
ReplyDeleteYes Madelon, at the end of each row I cut the yarn.
ReplyDeleteThis shawl is absolutely beautiful & the pattern is very easy to follow.I,m doing mine in a soft baby pink yarn & I,m thrilled.Thanks so much for sharing
ReplyDeleteHow many yarn do you need for one scarf?
ReplyDeleteWouldn't it be possible (to avoid so many ends to weave in) to make it back-and-forth? Between having half my flowers backwards and having to weave in a few dozen ends ... I'd opt for the reversible/half of flowers backwards look!
ReplyDeleteI tried to make it without cutting the yarn. You should make slip stitch all over the last flower to skip and start the next row. I prefer weaving the ends :)
ReplyDeleteWhen I begin the next row I weave the yarn while I crochet the flower. At the end of row, when I cut, I weave immediately.
Sorry about the yarn weight. My scale needed batteries and I couldnt weigh how much I used for the shawl.
ReplyDeletehttp://us-mg6.mail.yahoo.com/ya/download?mid=2_0_0_1_78323_AOJL2kIAAWMZUYCAqw7mTXtpAXA&pid=1&fid=Inbox&inline=1
ReplyDeleteI made the flower shawl from your pattern using boysenberry color yarn, then i put different colored flowers every so often.
I also made one with bay weight yarn. Made crochet flowers to use as buttons on both.
How many flowers do you have in your first row?
ReplyDeletethis is a beautiful pattern, very similar to a pattern by Paton which I have tried several times and have been unsuccessful in completing as the daisy is made one half at on each row. Thank you for sharing this pattern, it is simple to follow and easy to adjust to my specific needs. I made it an infinity scarf!
ReplyDeleteAbsolutely beautiful, thank you! I just finished mine and it turned out great!
ReplyDeleteBeautiful thank you.
ReplyDeleteHi! Pure Craft and everyone else. This flower shawl is very beautiful BUT i have a BIG PROBLEM to start it. I'm doing the same as the first image and then i don't understand what i need to do? Do i need to repeat #1 - ch6, work 2 dc in the first chain space, ch3, work 3 dc in the same chain space till 50 inch and then AFTER I'm doing #2 step (ch4 and turn. work 3 dc in 3 chain space, ch3, work 3 dc in the same space.) It's not clear to me. Please i need your help. Thanks.
ReplyDeleteYou will make step 1 and then step 2, then you will repeat step 2 until it is 50 inch.
ReplyDelete1-ch6, work 2 dc in the first chain space, ch3, work 3 dc in the same chain space
2-(ch4 and turn. work 3 dc in 3 chain space, ch3, work 3 dc in the same space.)
The next rows you will repeat (ch4 and turn. work 3 dc in 3 chain space, ch3, work 3 dc in the same space.) until it is 50 inch.
I hope it is clear now.
I don't understand where I must work 3dc when I turn...
ReplyDeleteYou have 3 dc and 3 ch and another 3 dc in the previous row. You will make 3 dc in the chain space.
ReplyDeleteOne of the photos is not displayed. The third of the pattern.
ReplyDeleteI dont know what happened to the photos, they disappeared. I will fix that soon.
ReplyDeletePlease fix the photo. Need to see where you connect the first flower! Awesome project!
ReplyDeleteI'd love to share an image and link to your Summer Flowers Shawl in a roundup of patterns for Wear Red Day, an event in the United States to help promote awareness of women's heart disease.
ReplyDeleteIf I have permission to include your photo in the roundup image, please let me know. Thank you.
Yes, of course Marie. I would love that..
ReplyDeleteBeautiful in any Color.
ReplyDeleteThe last photo still does not display : ( I have some variegated purple cotton that just might be the one for this project. : )
ReplyDelete